
How To Traverse the DOM
The previous tutorial in this series, How to Access Elements in the DOM, covers how to use the built-in methods of the document object to access HTML elements by ID, class, tag name, and query selectors. We know that the DOM is structured as a tree of nodes with the document node at the root and every other node (including elements, comments, and text nodes) as the various branches.
Often, you will want to move through the DOM without specifying each and every element beforehand. Learning how to navigate up and down the DOM tree and move from branch to branch is essential to understanding how to work with JavaScript and HTML.
In this tutorial, we will go over how to traverse the DOM (also known as walking or navigating the DOM) with parent, child, and sibling properties.
Setup
To begin, we will create a new file called nodes.html comprised of the following code.
<!DOCTYPE html>
<html>
<head>
<title>Learning About Nodes</title>
<style>
* {
border: 2px solid #dedede;
padding: 15px;
margin: 15px;
}
html {
margin: 0;
padding: 0;
}
body {
max-width: 600px;
font-family: sans-serif;
color: #333;
}
</style>
</head>
<body>
<h1>Shark World</h1>
<p>The world's leading source on <strong>shark</strong> related information.</p>
<h2>Types of Sharks</h2>
<ul>
<li>Hammerhead</li>
<li>Tiger</li>
<li>Great White</li>
</ul>
</body>
<script>
const h1 = document.getElementsByTagName('h1')[0]
const p = document.getElementsByTagName('p')[0]
const ul = document.getElementsByTagName('ul')[0]
</script>
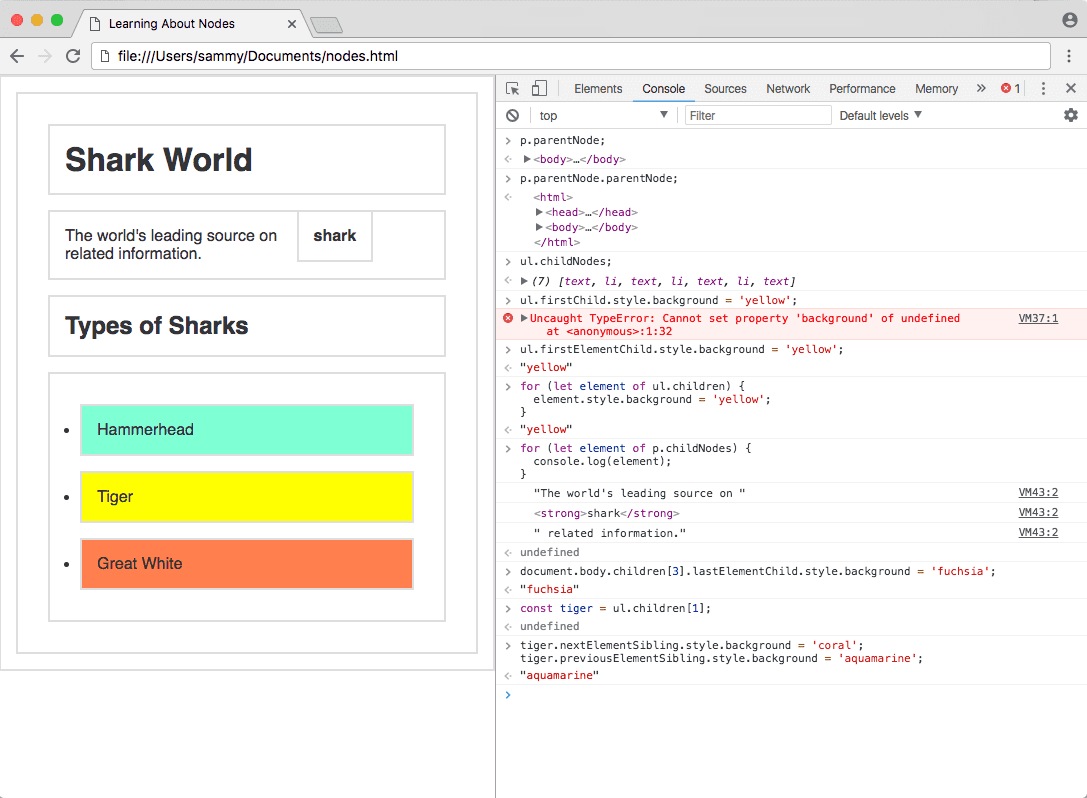
</html>When we load the file in a web browser, we'll see rendering that looks like the following screenshot.
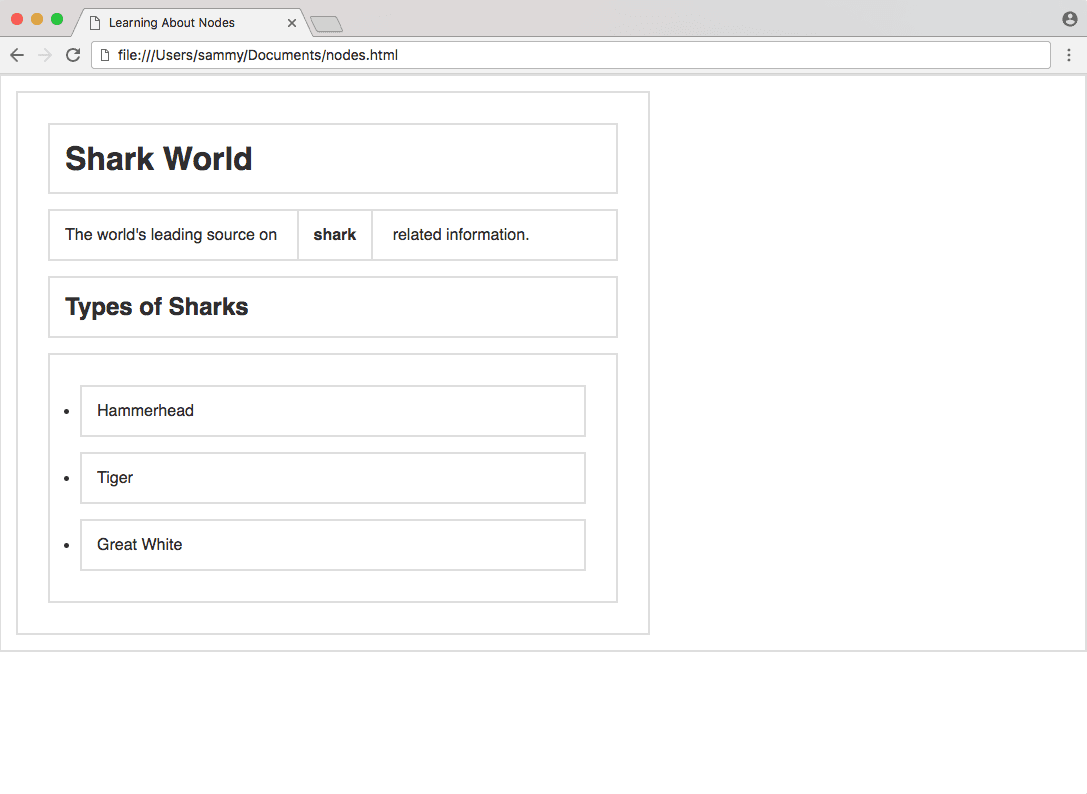
In this example website, we have an HTML document with a few elements. Some basic CSS has been added in a style tag to make each element obviously visible, and a few variables have been created in the script for ease of access of a few elements. Since there is only one of each h1, p, and ul, we can access the first index on each respective getElementsByTagName property.
Root Nodes
The document object is the root of every node in the DOM. This object is actually a property of the window object, which is the global, top-level object representing a tab in the browser. The window object has access to such information as the toolbar, height and width of the window, prompts, and alerts. The document consists of what is inside of the inner window.
Below is a chart consisting of the root elements that every document will contain. Even if a blank HTML file is loaded into a browser, these three nodes will be added and parsed into the DOM.
| Property | Node | Node Type |
|---|---|---|
document |
#document |
DOCUMENT_NODE |
document.documentElement |
html |
ELEMENT_NODE |
document.head |
head |
ELEMENT_NODE |
document.body |
body |
ELEMENT_NODE |
Since the html, head, and body elements are so common, they have their own properties on the document.
Open the Console in DevTools and test each of these four properties by submitting them and viewing the output. You can also test h1, p, and ul which will return the elements due to the variables we added in the script tag.
Parent Nodes
The nodes in the DOM are referred to as parents, children, and siblings, depending on their relation to other nodes. The parent of any node is the node that is one level above it, or closer to the document in the DOM hierarchy. There are two properties to get the parent — parentNode and parentElement.
| Property | Gets |
|---|---|
parentNode |
Parent Node |
parentElement |
Parent Element Node |
In our nodes.html example:
htmlis the parent ofhead,body, andscript.bodyis the parent ofh1,h2,pandul, but notli, sinceliis two levels down frombody.
We can test what the parent of our p element is with the parentNode property. This p variable comes from our custom document.getElementsByTagName('p')[0] declaration.
p.parentNode;<body>
...
</body>The parent of p is body, but how can we get the grandparent, which is two levels above? We can do so by chaining properties together.
p.parentNode.parentNode;<html>
...
</html>Using parentNode twice, we retrieved the grandparent of p.
There are properties to retrieve the parent of a node, but only one small difference between them, as demonstrated in this snippet below.
// Assign html object to html variable
const html = document.documentElement;

console.log(html.parentNode); // > #document
console.log(html.parentElement); // > null
The parent of almost any node is an element node, as text and comments cannot be parents to other nodes. However, the parent of html is a document node, so parentElement returns null. Generally, parentNode is more commonly used when traversing the DOM.
Children Nodes
The children of a node are the nodes that are one level below it. Any nodes beyond one level of nesting are usually referred to as descendants.
| Property | Gets |
|---|---|
childNodes |
Child Nodes |
firstChild |
First Child Node |
lastChild |
Last Child Node |
children |
Element Child Nodes |
firstElementChild |
First Child Element Node |
lastElementChild |
Last Child Element Node |
The childNodes property will return a live list of every child of a node. You might expect the ul element to get three li elements. Let's test what it retrieves.
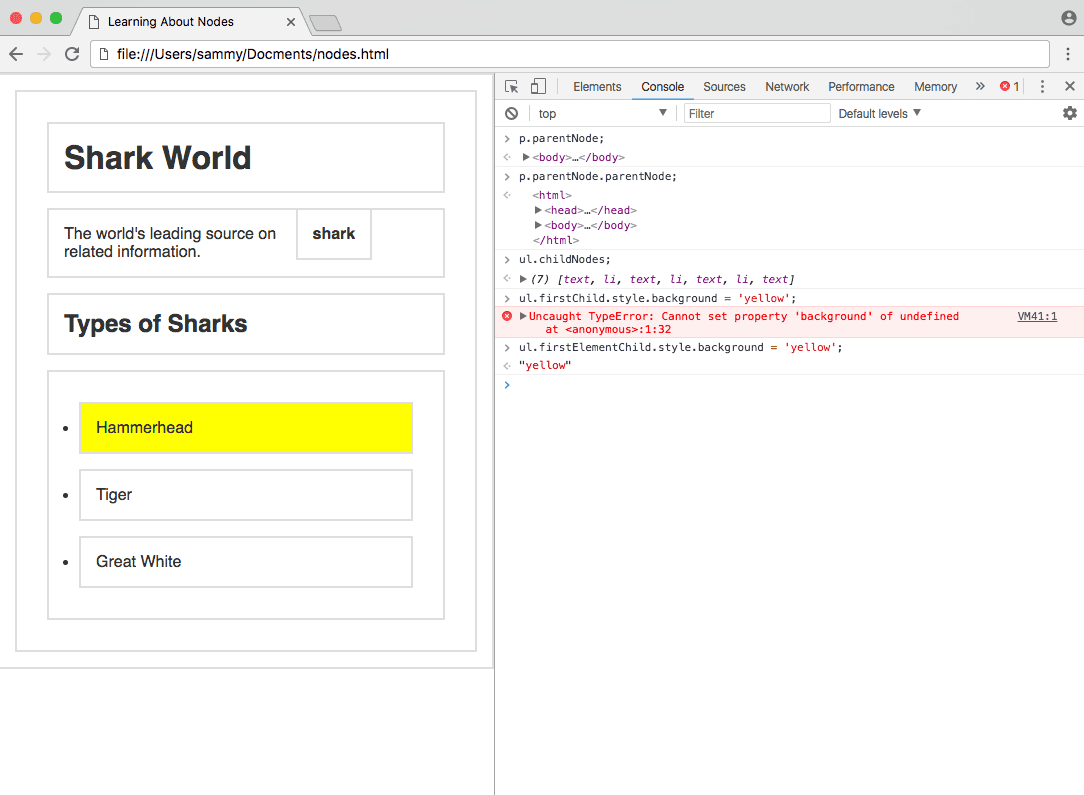
ul.childNodes;;(7)[(text, li, text, li, text, li, text)]In addition to the three li elements, it also gets four text nodes. This is because we wrote our own HTML (it was not generated by JavaScript) and the indentation between elements is counted in the DOM as text nodes. This is not intuitive, as the Elements tab of DevTools strips out white space nodes.
If we attempted to change the background color of the first child node using the firstChild property, it would fail because the first node is text.
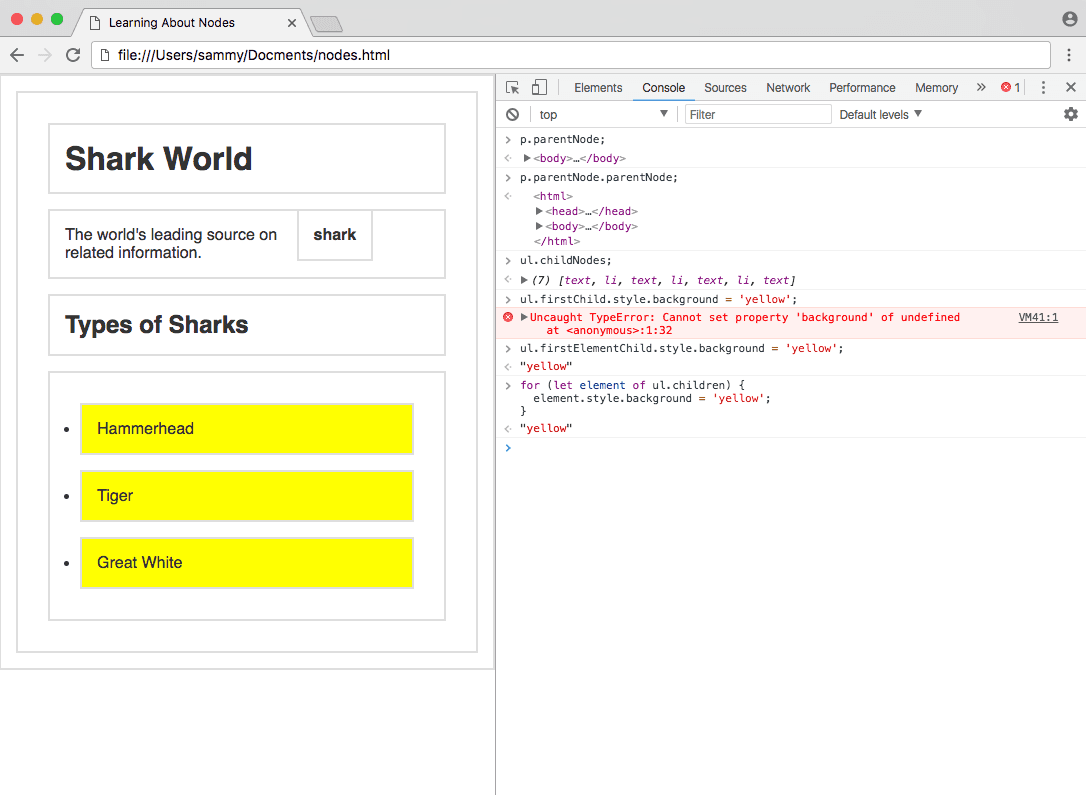
ul.firstChild.style.background = 'yellow';Uncaught TypeError: Cannot set property 'background' of undefinedThe children, firstElementChild and lastElementChild properties exist in these types of situations to retrieve only the element nodes. ul.children will only return the three li elements.
Using firstElementChild, we can change the background color of the first li in the ul.
ul.firstElementChild.style.background = 'yellow';When you run the code above, your webpage will be updated to modify the background color.
When doing basic DOM manipulation such as in this example, the element-specific properties are extremely helpful. In JavaScript-generated web apps, the properties that select all nodes are more likely to be used, as white-space newlines and indentation will not exist in this case.
A for...of loop can be used to iterate through all children elements.
for (let element of ul.children) {
  element.style.background = 'yellow';
}
Now, each child element will have a yellow background.
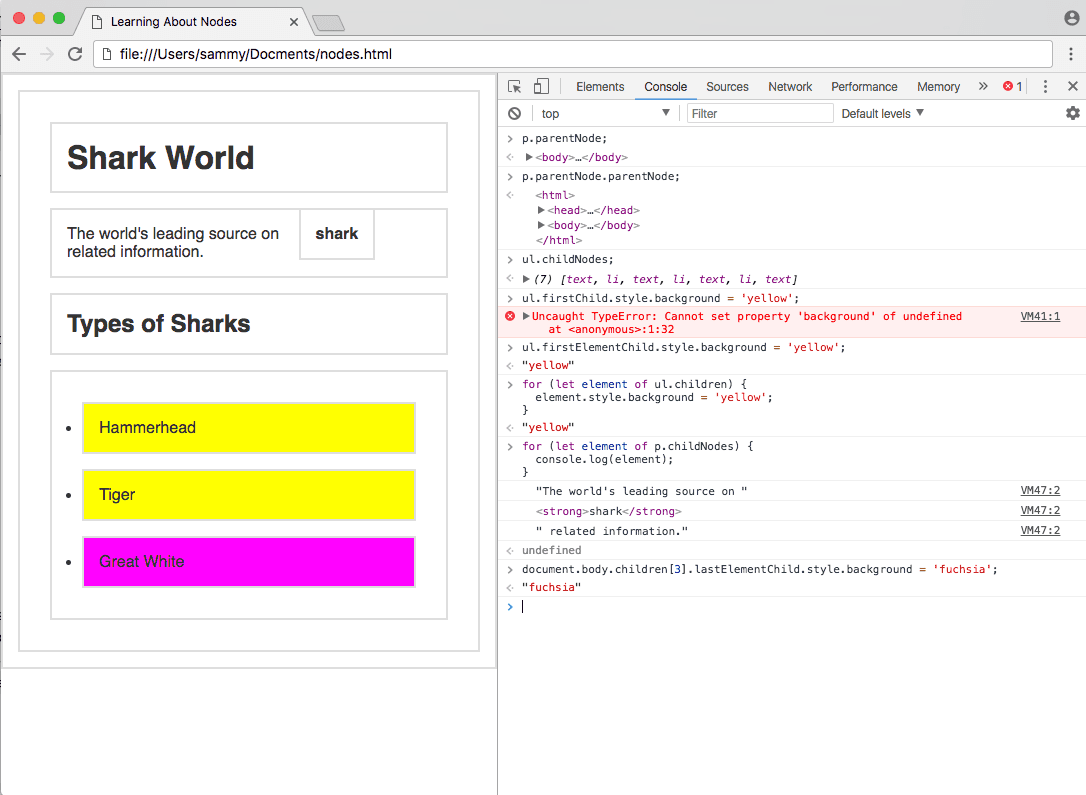
Since our p element has both text and elements inside of it, the childNodes property is helpful for accessing that information.
for (let element of p.childNodes) {
  console.log(element);
}"The world's leading source on "
<strong>shark</strong>
" related information."childNodes and children do not return arrays with all the Array properties and methods, but they appear and behave similarly to JavaScript arrays. You can access nodes by index number, or find their length property.
document.body.children[3].lastElementChild.style.background = 'fuchsia';The above code will find the last element child (li) of the fourth child element (ul) of body and apply a style.
Using parent and child properties, you can retrieve any node in the DOM.
Sibling Nodes
The siblings of a node are any node on the same tree level in the DOM. Siblings do not have to be the same type of node - text, element, and comment nodes can all be siblings.
| Property | Gets |
|---|---|
previousSibling |
Previous Sibling Node |
nextSibling |
Next Sibling Node |
previousElementSibling |
Previous Sibling Element Node |
nextElementSibling |
Next Sibling Element Node |
Sibling properties work the same way as the children nodes, in that there is a set of properties to traverse all nodes, and a set of properties for only element nodes. previousSibling and nextSibling will get the next node that immediately precedes or follows the specified node, and previousElementSibling and nextElementSibling will only get element nodes.
In our nodes.html example, let's select the middle element of ul.
const tiger = ul.children[1];Since we created our DOM from scratch and not as a JavaScript web app, we will need to use the element sibling properties to access the previous and next element nodes, as there is white space in the DOM.
tiger.nextElementSibling.style.background = 'coral';
tiger.previousElementSibling.style.background = 'aquamarine';
Running this code should have applied coral to the background of Hammerhead and aquamarine to the background of Great White.
Sibling properties can be chained together, just like parent and node properties.
Conclusion
In this tutorial, we covered how to access the root nodes of every HTML document and how to walk the DOM tree through parent, child, and sibling properties.
With what you learned in How to Access Elements in the DOM and this tutorial, you should be able to confidently access any node in the DOM of any website.
This article was originally written for DigitalOcean.
Comments